Bob The (SIPs) Builder -- Part 1

This is the account of a first time self-builder Bob Birch and his good lady wife as they embarked on construction of their new home using structural insulated panels.
Bob approached this project with a clear and concise frame of mind. He envisaged much of what could happen and he has adapted to what did happen during the SIPs construction period.
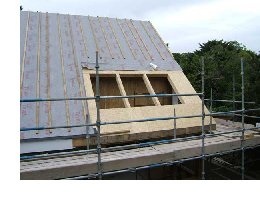
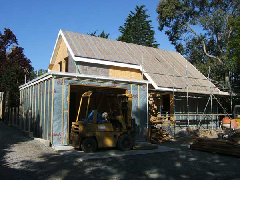
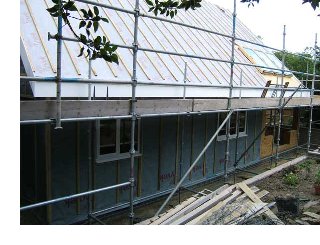
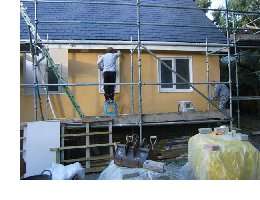
In his attempts to follow and document the build from beginning to end he has kept a photographic record of each and every stage for this build.
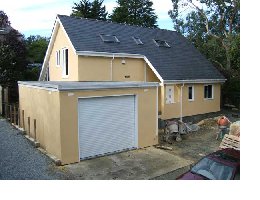
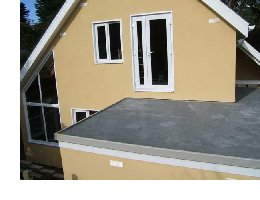
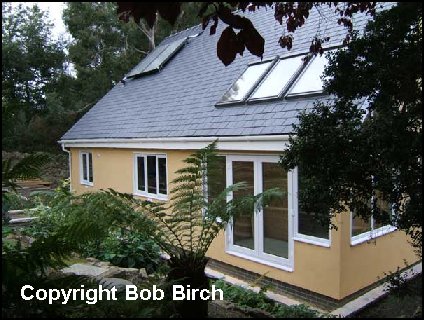
Several of these photographs (Copyright Bob Birch) are published along with this article to show various stages of the construction as it progressed.
The First Steps
Bob had investigated numerous ecological avenues towards constructing himself a "green" retirement home for him and his wife. They already lived in a substantial home in North Wales with a large garden. As they both liked the area where they lived, it was jointly decided that their new dwelling should be built in their own existing garden!
Firstly Bob made sketches of the existing house and garden and then created the footprint of this proposed new dwelling facing toward the back lane. Following this they created various house layouts before deciding upon that layout which best suited their individual needs. Having achieved this Bob produced an accurate sketch depicting the overall layout with its rooms and windows.
 Having more or less decided on their requirements the next stage was to approach the Local Planning Authority. Bob took his plans and sketches to the local office and had in-depth discussions as to what was required and what omissions to his plans were required in order that permission for this green build could be obtained.
Bob took these revisions on board and modified his plans and drawings to the required content necessary for putting this before the local council for official approval.
Although this was a new green style construction, the local authority seemed quite amicable to its development and accordingly gave Bob their approval.
Financing The Project
Now came the first major decision... how to raise the finance for such a construction. Bob decided the only way forward would be to sell off their own home before committing themselves to this construction.
 Again Bob and his wife were strong and capable in making this decision, but it was only borne out by their dedicated resolve to throw themselves jointly into this venture. Having the foresight and determination to carry it through to its bitter end, come what may in the meantime, was a committment that they made from day 1.
They decided to partition off the existing garden such that the main house could be sold, leaving what remained as being sufficient to build the new dwelling and to retain a reasonable sized piece of garden for themselves.
The immediate problem in this would be where to live while the construction was taking place. This was resolved by the purchase of a caravan, of reasonable but moderate proportions such that Bob and his wife could live at the construction site while building their new home. Bob had planned to be actively involved at each and every stage of the build.
Choosing A SIPS Home
Before any building work could take place the actual building construction had to be settled upon. Having researched this thoroughly, Bob had several options open to him. Amongst these was the SIPs construction option.
 After a period of comparison and investigation, Bob had decided that SIPs was to be his chosen method for this build. He could see the many benefits SIPs offered over traditional forms of construction.
Our first contact with Bob came at a design meeting, where we were introduced and given the outline of what Bob desired.
In simple terms, Bob had a set of his sketches and drawings with a range of notes and other information. This he discussed at length in order that we were fully conversant with all of his desires on this project. We in return discussed the features of build, the panels sizes available etc.
The first meeting ended with us going away to produce the first draft of what we envisaged as Bobs desires. This was produced in 3D modelling form and coloured drawing copies were forwarded to Bob for his comments.
 Bob in true form returned with specific related comments and questions that enabled us to continue the design into panel breakdown -- this being the stage after basic modelling where the project becomes more real and accurate.
This revised stage of design was released to Bob for his approval and comment in readiness for us creating the individual panel detail sheets for manufacture.
The generalised approval was received from Bob and the design progressed into the final detail stage for SIPs and for all timber inserts. Also and included with this stage was the structural content design -- the part relating to stability and support.
The structural content was overseen by Bob’s structural engineer and he had already foreseen several points and had pointed these out in readiness for this stage of the building development. These points were taken on board and discretely included into the panel design with the inclusion of dedicated structural props through the build and up to the roof beams.
The final stages of the design were completed and all SIPs and timber details were passed onto the manufacturer to be made and delivered to Bob on site.
Getting The Panels Manufactured
It now remained to chose a manufacturer. This again needed a good degree of investigation and before making his final decision on a SIPs producer, Bob visited manufacturing companies to see how the process was achieved and to what degree of confidence and satisfaction he derived from these individual suppliers.
 In this decision, cost was of strategic importance, not that Bob wanted to use the cheapest SIPs product, but that an economic balance should be maintained by whichever supplier he decided to place his SIP panel order with.
Cost for the other building supplies and materials was pretty much known and would only differ marginally from supplier to supplier, but for SIPs there were great variations throughout the relatively few available suppliers and at this time. There was little in the way of standardisation in SIPS panels and sizes.
Having finally come to a decision, Bob placed his order with a major producer of SIP panels and in doing so he handed his plans and sketches over to them for their evaluation. This included the cut sizes to be produced on this project.
Bob also engaged the services of an independent structural engineer, to oversee the construction methods and suitability of SIPs in this construction, ensuring that all loadings and their supports would be satisfied to regulation.
 This enabled Bob to maintain the house layout that he desired with his structural engineer directing the position of load lines down through the building and advising in the desired arrangement of the SIPs panels.
The SIPs producer then transposed this information, taken from Bobs drawings and from his structural engineer, into SIPs drawings, approval stages and discussions were conducted until all parties were satisfied with the final agreed content. From this the SIPs producer engineered the panels in accurate cut sizes and in designated batches to be shipped to site.
However and before any SIPs panels were to be despatched to site Bob had a great deal of ground work to undertake...
Making Changes to The Build
Bob, now well on with his footings and slab works, had further meetings with the SIPs manufacturers and SIPs designers, and wished to introduce several revisions.
 With a self-build, the owner / builder is always on the lookout for improvements and this may arise in all variety of ways as the build takes shape. This is particularly so when coming out of the ground with the footings and the slab. Slight dimensional changes happen and may benefit the final build i.e. moving or changing levels may avoid a future problems, re-aligning a wall may result in better access.
There are a whole multitude of reasons that can give rise to change, and by working close with the SIPs designers these can be taken on board quickly and in most cases before the panels are cut and shipped to site.
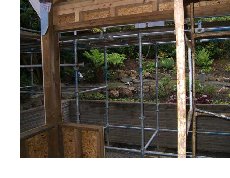
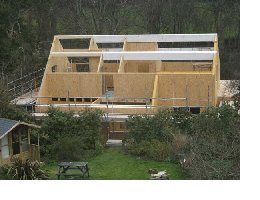
Having completed the majority of his bases, Bob called for the first batches of SIP panels to be delivered. These duly arrived and the main house construction began.
Running Into Problems
Amongst Bob’s biggest problems was the confined site and its accessibility. The construction site faced a narrow tree-lined lane of only about 3 metres wide, which proved to be a problem for large vehicles making deliveries to his site.
To off-load these vehicles was also somewhat of a problem. This Bob resolved by purchasing his own fork truck which also serves him well not only in off-loading but for moving heavy items around his site and for lifting to the upper levels of this construction.
Still a limitation was the space available in which to store materials on site and as such it was decided to accept batches of SIP panels only sufficient for each building stage as determined by Bob.
 However this itself gave rise to certain problems. When on occasion a panel of major importance was not found in the relative batch delivery, this could bring the whole project to a halt, particularly as only certain batches had been called for. This would render an alternative start at other points inapplicable.
SIP panels would be despatched from the manufacturers by their own transport and this would travel to Bob’s construction site, where after negotiating the narrow lane, Bob would be on hand to unload the SIPs with his fork truck.
Cut and shaped timbers for inserts and splines would also be despatched from the manufacturers by their own transport, usually along with the SIPs in the same load.
Avoiding Further Problems (Take Note Self-Builders!)
Bob, having previously laid the base for his SIPs home, now selected the pre-treated timbers for the sole plate and pressure strip. Accurately laying these in position, he fixed each down to the concrete base, shimming and levelling as he went around the perimeter of the construction.
 When the build is progressing well there is always that one moment when a particular SIPs panel is found not to be in the stack of panels ready for erection. the solution?
If a reasonably good stack of panels is available, this usually enables the build to commence from an alternative setting out point, providing that the necessary panels are all on site. Bear in mind that not all panels are of the same size and cut in these speciality buildings.
It is difficult to miss out a specific panel and continue with the next one across by means of measuring the gap, because the difficulty comes from being able to insert this missing panel when it finally becomes available, into a closed opening.
Bob’s advice is to start at one corner and build out from that position. If you get to a position where the next panel is missing, then return to the starting corner and re-start in the other direction.
 If panels are missing in both directions Bob recommends against starting a build sequence elsewhere -- unless it is an internal/external wall starting at right angles to another and coming off the walls already constructed.
Avoid at all times leaving a panel out and carrying on beyond its width.
This proves to be an absolute disaster. To rectify this position you will need a crane to lift and drop the panel into its position vertically along with the two fixing posts and in doing this it could get irretrievably stuck part way, causing all sorts of problems in having to get it out again or by cutting it up.
An important point to be aware of is that the glue expands quickly, particularly in warm damp weather. Trying to overcome the resistance of three glued joints simultaneously ‘with the inevitable slight spline / rebate misalignment’ will easily end with the panel only partly located but firmly glued in place. Not good!
Useful Tips From Bob
The basics for location of a large tall panel, as Bob recommends, is to first check out all rebates for size. It is much easier to clean out spline slots / rebates before you attempt to erect these panels and it can save you a good deal of time -- rather than having to take it all down again and do the remedial work.
Leave the application of glue until immediately before the final assembly at each stage of the build. The glue expands quite quickly, any delay at this point will make the assembly process much more difficult.
When working in low temperatures make sure that the glue is kept warm by keeping the glue bottles stood in warm water, this makes the glue more fluid and far easier to apply.
 Fit and glue the splines / timber insert in the last previously erected panel, and then quickly apply the glue to the sole plate and to the corresponding timber insert / spline.
Manoeuvre the panel onto the sole plate standing it vertically (or lower it into position using a crane). Leave only a small gap between it and the previous erected panel. Invariably the panel will not drop down over the sole plate under its own weight so tilt the panel, keeping its side faces vertical and parallel to the line of the sole plate so that the back corner of the panel engages first. Then pull or allow the panel to engage over the full length of its base.
The panel can then be slid along the sole plate and engage with the panel immediately behind. This is where the wooden block and sledgehammer are required.
If the vertical edge of the panel will not locate to its immediate neighbour, tilt the moveable panel such that you are able to engage the lower corner with the panel already erected, onto the splines or timber rebate previously inserted into the fixed panel.
Now close the gap and bring the movable panel to be vertical. Use blows from the sledge hammer as necessary. One or more ratchet straps may also be needed to aid this process.
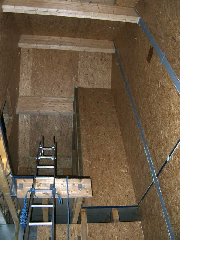
When erecting these panels bear in mind that the usual tolerance for the construction is set at +/- 2mm per joint. Make sure this is maintained at all times or the build can get somewhat askew!
As in the case for all SIPs construction projects, the alignment of panels is paramount in importance. At all stages continual checking for vertical lines is essential as is checking that the toleranced SIPs gaps are constant and are not being overly compressed or alternatively not being left with too great a gap.
Bob Birch's Advice on Basic Tools Required
Large sledge hammer (use a wooden block to protect edge of panels) to persuade panels to locate. Heavy duty ratchet straps to pull panels together (as used for securing lorry cargo) perhaps three or four sets.Flat bed 4 wheel hand truck to manoeuvre the SIPs panels around the site. This can be made out of an old SIPs panel and be fitted with industrial castors on each corner. Alternatively if you feel cheeky, borrow one from the SIP manufacturer! Simple gauges for checking depth and width of slots. Rope pulley block to drag panels up pitched roofs. This is mainly for panels that need lifting into place or those to be dragged into place on a steeply pitched roof. Long shank wood drill to fully penetrate the thickest panel to make holes for eye bolts. Eye bolts with threads longer than the thickest panel to attach a crane hook or rope block (2 or 3 required).
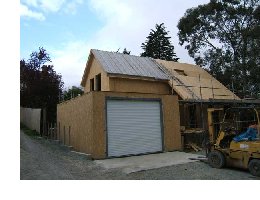
This for the moment concludes the first part of Bob the Builder and his experiences in the building of his SIPs home. Part two in this series will follow and in that Bob will describe other events such as fitting doors and windows and constructing the roof.
If you would like more information on our Sips design services for self-builders, please click here...


